Author: Superseed
-
How a single seal failure could cost you Millions

So far in the Oil Lab Series, we have covered the benefits of an on-site oil analysis laboratory, what your investment (and return thereof) could be, all the factors you need to keep in mind when building your lab, as well as Yellotec’s recommended 3 Phased Approach to set up your on-site lab.
In our last article of this series we will be looking at a case study of how an on-site laboratory and regular routine used oil analysis enabled a company to avoid a major costly failure.
During routine used oil analysis conducted at an on site laboratory situated on an opencast mine, the lab picked up an anomaly from a dump truck engine used on the mine. The lab observed an abnormal condition whereby the sodium increased and copper wear was observed within the oil samples over time.
If this anomaly was never detected, and the dump truck engine failed because of it, the cost to rebuild the whole engine would easily have been estimated to be R 5.4 million. Luckily, early detection of the fault condition, and subsequent intervention of the maintenance department, brought the actual cost to repair the failed cylinder liner down to R63 000.
Because of the company’s ability to take daily samples and perform immediate analysis in their on-site lab, they were able to observe the results of an oil change on the health of the machine, as well as effectively take remedial action when the liner was replaced. Clearly in this case, the on-site lab’s prompt response enabled this company to save millions.


Sample data:
Report examples showcasing progression and criticality of fault.

Thank you for following the Oil Lab Series. We hope it helped to provide you with a better understanding of the benefits and possibilities of setting up your on-site oil analysis laboratory.
Don’t hesitate to contact our Specialist Oil Lubrication team for more information.
-
3 Phased Approach: A quick guide to Oil Analysis instruments and tests

Previously in the Oil Lab Series we looked at tips to design your lab, specifically looking at your physical space as well as safety concerns. In this article we are expanding on your testing needs.
The below diagram breaks down the most important instruments, as well as the test that they perform.

At Yellotec, we recommend using a 3 phased approach to build and grow your laboratory. These 3 phases will allow you to set up your onsite lab whilst maximising your available budgets, as well as allowing you to expand your test slate without needing to replace instruments to upgrade. Here are the 3 phases:
Phase 1
- Oil Shaker
- Blotterspot
- Wear debris with Filtergram analysis
- Crackle test
- Ferrous Quantifier
This phase will enable you to do basic “Go Nogo” tests onsite to identify immediate problems that can be fixed before severe damage occurs to the lubricated machine.
Phase 2
- Reporting Software
- FTIR
- Viscometer
After this phase you will be able to analyse your samples in more depth, such as measuring the viscosity and chemical compounds found in the oil. The LIMS software allows you to collect test data in a organised database from which reports can be generated.
Phase 3
- Spectrometer
- Karl Fischer
- Refractrometer
- PH meter
- Flash Point Tester
Talk to our expert Oil Lubrication team at Yellotec if you need any guidance with your Oil Analysis testing needs, as well as how you can use the 3 Phased Approach to expand your laboratory capabilities.
-
Tips On Designing Your Lab Space

Previously on the Oil Lab Series we looked at the investment needed to set up and run your own oil analysis lab. In this article we look at some factors that you need to keep in mind when designing your lab space.
The design of your lab is mostly dependant on your oil analysis requirements, but also other factors such as available physical space, work flow efficiency and, most importantly, safety.

Oil Analysis Requirements:
Your oil analysis needs will determine the type of tests you need to run on your samples, as well as the instruments required to run those tests. We will be covering tests and instruments in greater detail in the next article of the Oil Lab Series.Physical Space:
To set up a lab, you need to ensure that you have the physical space that:- has a layout assisting efficient work flow;
- has a carefully controlled climate, including temperature and humidity;
- take steps to minimise airborne contaminants;
- has adequate ventilation, particularly if noxious chemicals will be used;
- adequate workspace and hook-up for air, water and power, including room for expansion if planned; and
- enough storage to be able to store samples for a minimum of three months for retest or lab analysis.
Safety:
Running a lab requires the use of chemicals and chemical reactions, and so it is always important to keep the health and safety of you and your fellow workers a number one priority. Make all essential safety equipment available, including eye protection, gloves and MSDS sheets. Ensure that all staff have been trained on safety procedures.If you do not have the space and capacity yet to build and run a full-scale lab, you can easily start with a smaller version and expand as and when you are able to. The below schematic illustrates how you can start with a smaller lab layout inside a container, and how it can grow and expand into a full-scale operation with your own building.


-
Is it worth the investment of an Oil Analysis Lab?

In the previous article of the Oil Lab Series we looked at the benefits of having your own lab, including the low cost per sample. But what exactly would the investment be to build a lab, and when could you expect a return on this investment?
There are normally three costs involved with owning your own lab:
- Laboratory Setup – the initial investment to set up your lab, including infrastructure, instrumentation and consumables
- Labour Cost – costs to train and employ qualified staff, including a diagnostician, instrument operator, oil sample collector
- Cost per Sample – how much it would cost to run your laboratory
The below diagram illustrates the return on investment of a lab running more than 10,000 samples a year. However, keep in mind that your ROI will be dependent on several factors, including your oil analysis requirements, plant capacity and degree of infrastructure.

Contact our expert Laboratory team at Yellotec for a full cost analysis of your lab requirements.
Now that you have a better understanding of the cost implications of owning and running your own lab, we will next be looking at what factors you need to keep in mind when designing your lab space.
*Please note that this is only an estimation of costs, and based on 2019 rates.
-
Why you should think about having an On-Site Lab

We all know the value of having a well-planned Oil Lubrication Program in place to ultimately reduce the number and severity of potential failures. However, in cases where your program is restricted by high sample volumes and you have critical machinery being monitored, running an on-site laboratory might be a better option for you.
The biggest benefits of an on-site lab is the low cost per sample, as well as the short turnaround times for results. In addition to this, an on-site laboratory will ensure that you develop local expertise and will help promote a proactive maintenance culture, ultimately reducing the number of unplanned breakdowns.

It is one thing to save on running your own lab, however how much would the initial investment be? In the next part of the series, we’ll be looking at the overall cost benefit and the possible Return of Investment of a laboratory.
Interested in building your own lab? Speak to our Oil Lubrication Specialist Team at Yellotec to explore your options.
-
Oil Lab Series

Ever considered running your own on-site oil analysis lab? What is involved with this process and what could the cost benefit be?
The Oil Lab Series will be exploring the different facets involved with building and running an on-site oil analysis lab. We will be covering the benefits and cost implications of a lab, things you need to consider and Yellotec’s recommended 3 Phased Approach to build your own laboratory.
Oil Lab Series Articles

Why you should think about having an On-Site Lab
Oil Lab Series Article 1 – Reasons to Invest in an On-Site Oil Analysis Lab

Is it worth the investment of an Oil Analysis Lab?
Oil Lab Series Article 2 – Investment Scenario

Tips On Designing Your Lab Space
Oil Lab Series Article 3 – Tips On Designing Your Lab Space

3 Phased Approach: A quick guide to Oil Analysis instruments and tests
Oil Lab Series Article 4 – Yellotec’s recommended 3 phased approach to build your lab

How a single seal failure could cost you Millions
Oil Lab Series Article 5 – Read how an on-site lab avoided a big failure
-
New to Infrared Thermography?

These useful guidebooks from FLIR will introduce you to the world of thermal imaging and help you select the best tool for your application.
Is your company looking for a head start with a camera that offers unmatched power and flexibility? Then here is your answer!

Thermal imaging guidebook for industrial applications
An informative guide for the use of thermal imaging cameras in industrial applications
There are many details to pay attention to when carrying out infrared thermography inspections. As well as knowing how the thermal imaging camera works and how to take images, it is important to know the physics concerning the electrical or mechanical installation you’re inspecting and how it is constructed. All of this has to be taken into consideration to understand, interpret and judge thermal images correctly.
This popular guide book answers questions such as:
- How to use thermal imaging in an industrial environment?
- Why use thermal imaging?
- What are the basic infrared camera functions?

What Do You Need To Measure?
Make the right tool selection for your application
When it comes to troubleshooting equipment or assessing building deficiencies, it’s important to have the right tool for the job. This catalog shows all of your top tool choices and highlights their most important features so you can find the tools you need quickly, and get back to the job at hand.
-
How to identify motor defects using the rotor fault zone
The Rotor Fault Zone is part of the Six Fault Zones approach to access your motor’s condition.
The Rotor Fault Zone refers to the condition of the rotor bars, rotor laminations, and end rings. Although only a small percentage of the motor problems, rotor faults can influence other fault zones to fail.
This article from PdMA covers the Rotor Fault Zone in better detail.
Listen to Todd Gunderson the Vice President of Sales and Marketing for PdMA Corporation as describes how the MCEMax is an essential technology to help in the detection of Rotor anomalies
Listen to Noah Bethel and Todd Gunderson as they walk you through their latest case study showing the MCEMax finding a Wound Rotor Motor fault
Need a recap on all six fault zones?
Read our previous article with PdMA’s David L. McKinnon white paper that provides a brief introduction to a Six Fault Zone approach for predictive maintenance on motors.
-
Enter the Smart Factory era with cloud-based Laser Alignment
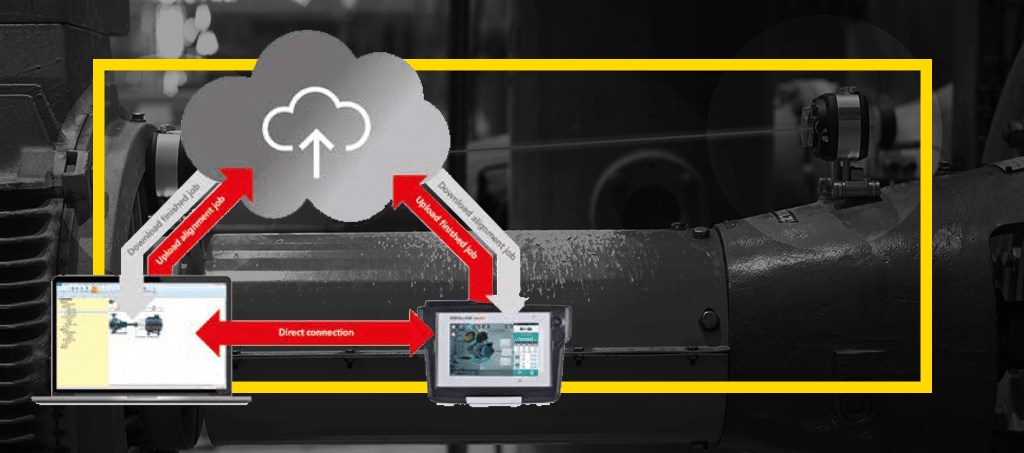
Big Data, Cloud, Internet of Things, and Smart Factory: This is just a selection of the buzzwords currently dominating the discussions in many industry sectors. Beneath all of this is the need for almost complete automation of production and control processes.
What exactly does this mean? Read the insightful white paper discussing the idea of the Smart Factory and how it is supported by the latest Laser Alignment systems.


